

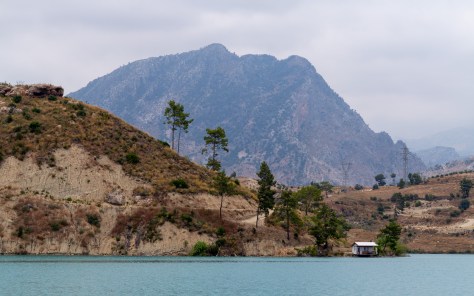
A small hut by a turquoise lake in Turkey, framed by orange hills and a towering mountain
This photo is part of a series I took during a boat ride on Turkey’s Green Lake — a trip where I quickly learned that shooting from a moving deck is less about carefully crafted composition and more about grabbing what you can before the boat turns. With no chance to wander around for the perfect angle, I fired off frames of the passing landscapes, half-hoping that at least one would hold enough potential to rescue later in post-processing.
Luckily, this little hut by the lake, framed by an orange hillside and a towering blue mountain, gave me exactly that. It became less a picture-perfect capture and more of a workshop challenge — how to take a “maybe” shot and shape it into a balanced, layered composition.
The Shooting Challenge
This shot of a lakeside hut in Turkey is a great case study for a common challenge: how to handle a powerful background without overwhelming your subject.
- The hut was small, while the mountain loomed large.
- The turquoise water drew attention but risked pulling the eye away.
- Cropping was tricky — too much sky, and the mountain looked diminished; too little, and the peak touched the frame.
The main goal was clear: keep the hut as the anchor of the scene, while letting the mountain and water play supporting roles.
Here’s the straight out of camera version of the hut by Green Lake in Turkey. The colors are a bit bland, the layers feel flat, and there’s no real focal point to guide the eye. Shooting from a moving boat meant I had to take what I could get — and that meant relying on post-processing later to shape the photo into something more balanced.
My Editing Process: Practical Steps in Lightroom/Camera Raw
Back on shore, the real journey began — this time in Camera Raw and Photoshop. My goal wasn’t to turn the scene into something it wasn’t, but to carefully balance the layers: turquoise water, orange hillside, scattered trees, and the blue mountain backdrop.
Here’s how I approached it step by step:
1. Starting in Camera Raw
I began with broad adjustments to set the mood:
- Light: Dropped highlights slightly to hold detail in the sky, while lifting shadows so the hut and trees didn’t vanish.
- Color: Gave a touch of vibrance, just enough to bring out the turquoise water and green trees without overcooking the scene.
This gave me a clean, workable base, but the magic comes from local adjustments.
2. Foreground Prominence with Local Masks
The hut and hillside risked blending into the bigger landscape, so I selectively pulled them forward:
- A Radial Filter around the hut and hillside, where I:
- Increased Texture and Clarity to add crisp detail.
- Lifted Shadows to separate the trees from the orange soil.
- This made the foreground more tactile — you can almost feel the rough hillside against the smoother water.
3. Managing the Background Mountain
The mountain is a stunning shape, but if treated the same way as the foreground, it quickly overwhelms everything. To keep it as a backdrop:
- A Graduated Filter over the mountain with –5 Texture and –10 Dehaze. This softened it slightly and mimicked the natural haze you’d see from the boat.
- No sharpening here — that would push it forward instead of letting it recede.
Later in Photoshop, I added a Lens Blur mask at low opacity (10–15%) over the peak to further separate it from the sharpness of the foreground.
4. Contrast Shift for Balance
To anchor the photo, I applied a Linear Gradient from the bottom upward:
- Shadows –5
- Contrast +8
This subtle adjustment darkened the water just a touch, giving visual “weight” to the lower frame. It works a bit like a graduated ND filter — grounding the eye before moving upward toward the hut and hill.
5. Dodging and Burning
In Photoshop, I fine-tuned the light flow:
- Dodged (lightened) the hut roof and a couple of tree tops so they wouldn’t disappear.
- Burned (darkened) small shadow lines on the hillside, enhancing texture and guiding the eye naturally toward the hut.
6. High Pass and Micro-Contrast
A soft High Pass filter (1.2px) blended at Overlay sharpened the hillside textures, but I carefully masked it so the mountain and water stayed smoother. This kept the detail where I wanted it — in the mid-ground.
7. Color Mixer and Color Grading
Color harmony tied it all together:
- Color Mixer:
- Oranges — shifted slightly warmer (+4 hue, +8 saturation) to give the hillside glow.
- Greens — lifted luminance (+6) so the trees stood out more clearly.
- Color Grading:
- Midtones leaned warm (a hint of orange).
- Shadows pushed cooler (subtle teal).
- This gave depth and a natural warm–cool interplay across the layers.
8. Final Touches
Vignette: A very subtle vignette applied last, just enough to keep the viewer’s gaze from drifting off the edges.
Crop: Settled on a version that left a thin strip of sky above the peak, giving the mountain breathing space.
Workshop Takeaway
The key here was treating each layer of the landscape differently. The foreground got clarity and texture, the mid-ground carried detail and warmth, while the mountain softened into the background. By dodging, burning, and selective blurring, I could control depth without losing the scene’s natural look.
This approach turns what might have been “just another shot from a boat” into a study in balance — something any photographer can try when faced with a strong background that risks stealing the show.
- Foreground → Enhance clarity, texture, and detail.
- Mid-ground → Balance contrast and color for storytelling.
- Background → Keep it softer to create depth.
This layered approach gives you control over the viewer’s attention and prevents complex scenes from feeling flat. If you find yourself shooting landscapes with a strong foreground subject and an overwhelming background, these techniques can help you achieve balance.
Final Thoughts
For hobbyist photographers, the challenge is turning a complicated scene into a natural story. And that’s where composition and post-processing come together.
✨ If you’ve ever struggled with a landscape where the background threatens to steal the spotlight, try experimenting with local adjustments and layer-specific editing — it’s amazing how much control a few subtle changes can give you.
If you enjoyed this breakdown, take a look at the full Ride Photo Lab series on my blog, where I share more behind-the-scenes edits, composition tips, and field notes from the road. 🚴♂️📷
Discover more from Shutter and Saddle
Subscribe to get the latest posts sent to your email.

Wow!
LikeLiked by 1 person
Thanks! 🙂
LikeLike
Nice photos and explanations Mike. I take a simpler approach to photography: use auto everything on my cellphone and do minor post edits.
LikeLiked by 1 person
Thanks! 🙂 I actually started the same way – just using presets in Lightroom for quick edits. Over time I got curious and began adding little steps in Photoshop, and now I’ve sort of taken over the whole process. I’m still just a hobbyist and learning as I go, but I’ve found that the more work you put into editing, the more satisfying the results feel. You might enjoy giving it a try too!
LikeLiked by 1 person
I’m glad you enjoy the process.
LikeLiked by 1 person